


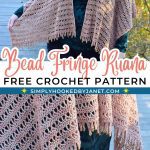
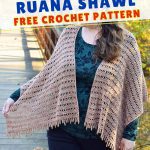
Designed for year-round style, this lightweight crochet ruana pattern is the perfect addition to your wardrobe. With its versatile and airy design, this ruana will keep you looking chic and comfortable in any season.
Using higher-end materials, this crochet ruana pattern will make you feel like you are wrapped in luxury. The stitch pattern combined with a superwash merino wool yarn will make this ruana maintain a soft and lightweight feel. It’s the ideal companion for those cool summer evenings or chilly winter days when layering is essential.
Whether you’re an experienced crocheter or a beginner looking for a new project, our easy-to-follow instructions will guide you every stitch of the way.
Embrace your inner fashionista with this lightweight crochet ruana pattern. From casual outings to special occasions, this versatile accessory will add a touch of elegance to any outfit.

Benefits of wearing a lightweight crochet ruana
Lightweight crochet ruanas are the ultimate in versatility and comfort. Whether you want the look of elegance or an extra layer of warmth, this accessory is the perfect choice. One of the primary benefits of wearing a lightweight crochet ruana is its ability to transition seamlessly between seasons.
During the warmer months, the airy, breathable crochet fabric creates a comfortable piece to wear. As the temperature gets colder, the ruana can be layered over a warmer outfit, providing a cozy and stylish solution to the changing weather. The lightweight construction ensures that you won’t feel weighed down, allowing for easy movements.
↓ Pin this pattern for later! ↓

Yarn, Stitches and techniques used
Choosing the right yarn to keep the ruana lightweight, comfortable and airy is crucial. This one uses a superwash merino wool, nylon blend. Specifically a #1 fingering/sock weight yarn. A Sock weight yarn is one of the thinner yarns you can use. Using this weight yarn for a crochet ruana also helps to keep it as lightweight as possible.
The stitch pattern itself for this lightweight crochet ruana is rather simple. After a few setup rows the pattern repeat is just 2 rows for both the back section as well as each front section.
This pattern uses a special stitch that is called the Y-Stitch. It is just a combination of a treble crochet stitch, a chain stitch and a double crochet stitch. There are also beginning double and treble crochet stitches which just replace beginning chain stitches that would start a row.
Styling options
You can try and style this ruana in several different ways. Whether you’re looking to create a casual, everyday look or a more formal, elegant ensemble, this garment can be adapted to suit any occasion or season.
Wear this over a tank top or t-shirt with some shorts in the warmer months. Wear this over a solid colored dress. Or wear this over a long sleeve short with jeans during cooler months.
A couple other styling options include adding to the actual ruana itself. A broach or shawl pin can be used to close the front sections together. A belt can be used to gather the fabric of the ruana around the waist. This crochet ruana shawl can easily be a go-to piece in your wardrobe.
Other fancy shawls you may like!
Materials:
- YARN:
- #1 Fingering Weight, KT and the Squid Twist Sock – 85% Superwash Merino Wool, 15% Nylon; 360 yds/100 g; 950 (1,080, 1,310) total yards or suitable substitute
- TOOLS:
- US Size (F/5) 3.75 mm crochet hook or size needed to obtain gauge
- Yarn Needle, Scissors, Blocking Materials, Size 6/0 Seed Beads, .75 mm steel crochet hook or size that will fit inside the beads
Gauge:
- (blocked) 20 dc x 8 rows of pattern = 4”/10 cm
Sizes:
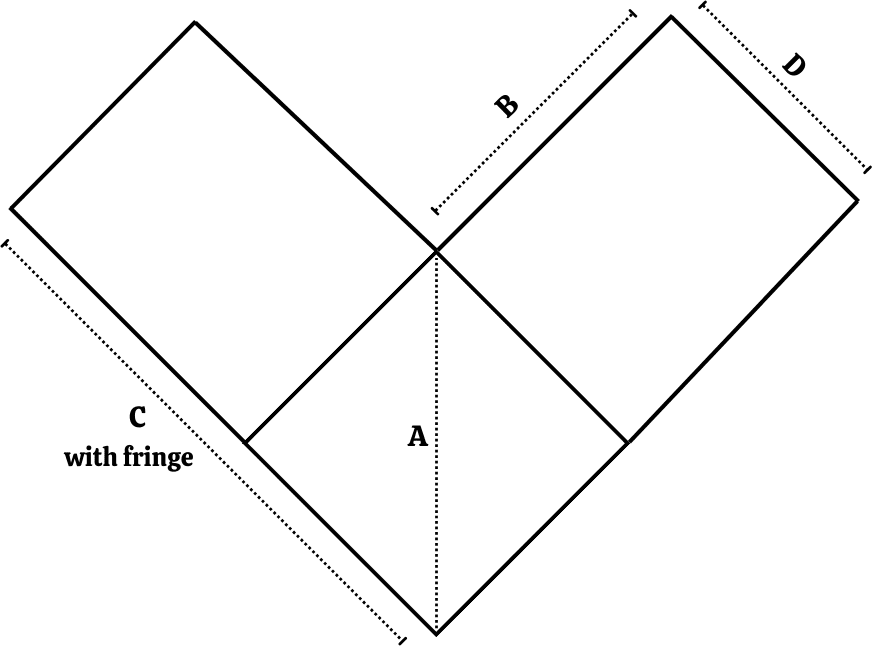
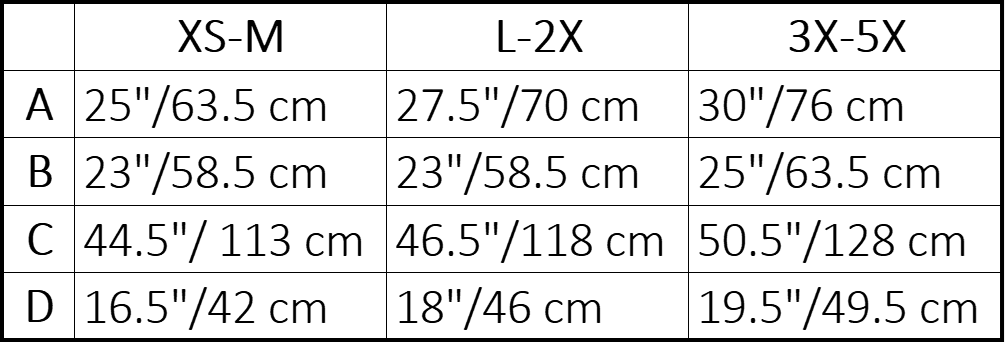
- XS-M (L-2X, 3X-5X) schematic shows blocked dimensions
Stitches/Abbreviations: US Terms
- ch – chain
- sl st – slip stitch
- sts – stitches
- sp – space
- sk – skip
- sc – single crochet
- dc – double crochet
- tr – treble crochet
- Special Stitches: Y-Stitch (Y-st) = tr in indicated st, ch 1, dc in bottom 2 vertical bars of tr st; Beg dc = do not ch to start, sc in first st, sc in left vertical bar of sc just made; Beg tr = do not ch to start, sc in first st, (sc in left vertical bar of sc just made) 2 times
Notes:
- This shawl is worked in 3 sections – a center square is worked first using a mitered square technique, then each front panel is worked off a specific side of the square.
- Parentheses ( ) indicate a group of stitches all worked into the same st/sp.
- Brackets [ ] indicate a set of instructions worked as many times as directed.
- Each row begins with either a beginning dc or beginning tr rather than a starting turning chain. See special stitches above on how to work each one.
- When sharing on social media use the hashtag: #simplyhookedbyjanet
Considering purchasing the pdf of this pattern?
This pattern was part of a Shrugs & Wraps that Hug Blog-Hop Hosted by Sandra from Sandra Stitches.



Instructions:
BACK SQUARE
Create a magic ring.
Row 1: In ring, ch 2, (3 dc, ch 2) 4 times, join with a sl st, TURN. 12 dc, 4 ch-2 sps
Row 2: Ch 1, beg dc in ch-2 sp, dc in next 3, (dc, tr, ch 2, tr, dc) in ch-2 sp, dc in next 3, dc in next ch-2 sp, TURN. 12 sts, 1 ch-2 sp
Row 3: Beg tr, tr in next, sk 1, Y-st in next, sk 1, tr in next, (2 tr, ch 2, 2 tr) in ch-2 sp, tr in next, sk 1, Y-st in next, sk 1, tr in last 2, TURN. 10 tr, 2 Y-sts, 1 ch-2 sp
Row 4: Beg dc, dc in each st and ch sp across to center ch-2 sp, (dc, tr, ch 2, tr, dc) in ch-2 sp, dc in each st and ch sp across, TURN. 20 sts, 1 ch-2 sp
Row 5: Beg tr, tr in next, [sk 1, Y-st in next, sk 1, tr in next] across to center ch-2 sp, (2 tr, ch 2, 2 tr) in ch-2 sp, tr in next, [sk 1, Y-st in next, sk 1, tr in next] across to last st, tr in last, TURN. 12 tr, 4 Y-sts, 1 ch-2 sp
Row 6: Beg dc, dc in each st and ch sp across to center ch-2 sp, (dc, tr, ch 2, tr, dc) in ch-2 sp, dc in each st and ch sp across, TURN. 28 sts, 1 ch-2 sp
Rows 7-40 (44, 48): Repeat Rows 5-6. Turn after last repeat row is worked. Continue to Front Panel 1. 164 (180, 196) sts
FRONT PANEL 1
Row 1: Beg tr, tr in next, *sk 1, Y-st in next, sk 1, tr in next; repeat from * across to center ch-2 sp, tr in ch-2 sp, place a st marker in the same ch-2 sp as last st worked as this will be where the Front Panel 2 begins, TURN. 23 (25, 27) tr, 20 (22, 24) Y-sts
Row 2: Beg dc, dc in each st and ch sp across, TURN. 82 (90, 98) sts
Row 3: Beg tr, tr in next, *sk 1, Y-st in next, sk 1, tr in next; repeat from * across to last st, tr in last, TURN. 23 (25, 27) tr, 20 (22, 24) Y-sts
Rows 4-46 (46, 50): Repeat Rows 2-3, end on a Row 2 repeat. Turn after last Row worked and continue to Fringe Row.
Fringe Row:
How to add a bead
Using a size .75mm crochet hook or any size that will fit through the bead, place the bead on the small hook, with bead on the hook, put the hook through the working yarn loop, pull the loop through the bead, grab the larger hook and continue working the pattern as written.
Ch 1, sl st in first, *[ch 7, add 3 beads, sl st in 2nd ch from hook, sl st in remaining chains, sl st in next 2 sts of last panel row] 2 times, ch 10, add 3 beads, sl st in 2nd ch from hook, sl st in remaining chains, sl st in next 2 sts of last panel row; repeat from * across.
FRONT PANEL 2
With Front Panel 1 to the right, join yarn to center ch-2 sp where st marker is.
Row 1: Beg tr in same ch-2 sp, tr in next, *sk 1, Y-st in next, sk 1, tr in next; repeat from * across to last st, tr in last, TURN. 23 (25, 27) tr, 20 (22, 24) Y-sts
Row 2: Beg dc, dc in each st and ch sp across, TURN. 82 (90, 98) sts
Row 3: Beg tr, tr in next, *sk 1, Y-st in next, sk 1, tr in next; repeat from * across to last st, tr in last, TURN. 23 (25, 27) tr, 20 (22, 24) Y-sts
Rows 4-46 (46, 50): Repeat Rows 2-3, end on a Row 2 repeat. Turn after last Row worked and work Fringe Row instructions from Panel 1.
Fasten off and weave in ends.
FINISHING
Wet block or steam block project.
